Two years ago, I decided to switch from Aweber to Convertkit and so far, I haven’t looked back. However, I initially decided not to write my Convertkit review until the honeymoon phase was over and I could deliver a neutral review about it.
I don’t like much when people just switch from one service to another and they talk beautiful things about it while not really having tested them thoroughly. You end up getting all the bells and whistles minus the real problems.
But like I said, I switched 2 years ago. In those 2 years, I have used Aweber and Mailchimp for other (not personal) projects and in the end, I recommend my partners to move to Convertkit as their main email marketing software if their online business could benefit from it.
I think I moved to Convertkit around March 2017, and just so you know I’ve been using it here’s a screenshot of my dashboard from the past 6 months:
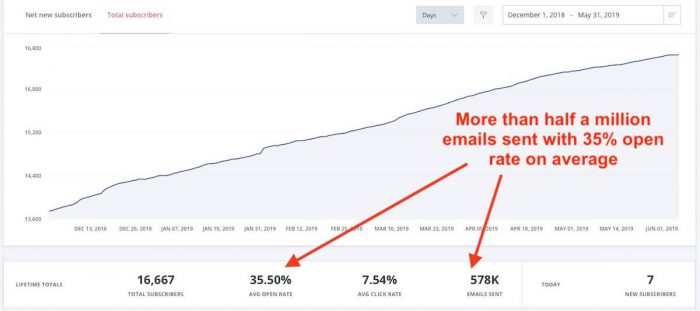
Convertkit has worked great for me and my blogs, with an overall open rate of 35% (some of my emails get over 50% open rate on average) and so far, it seems like I have sent almost 600,000 emails just with Convertkit. This is an interesting number I haven’t checked before!
You might have read that the average email open rate goes from 15% to 20% but you can get a lot more if you decide to work and improve a ton of different factors including segmentation, copywriting, deliverability, etc. I’ll explain a bit more about how I achieve great open rates in this article below, so if you’re interested, keep reading.
Many people switch ESPs (email service provider) thinking they’re going to get better open rates by just moving to a different company, and while that might be true to a point the reality is that most ESPs will work the same if you just keep doing the same and using the same strategies.
If you are a blogger and want to:
- Get more email subscribers and grow your email list
- Get better engagement and open/click rates
- Have your own online or digital products and want to make more sales
- Filter your email subscribers to understand their interests
Want to try Convertkit? Get a 14 days free trial here!
If you fit that profile then Convertkit is the best email marketing software for your online business. Let me explain to you in this review why I like Convertkit and why I have tried Aweber and Mailchimp lately and still go back to Convertkit every time.
Table of Contents
Convertkit Tags and basic segmentation
One of the most features in Convertkit, in my opinion, is the ability to use tags to segment your audiences.
You can use this and be creative for whatever you need, but in my case, being a blogger, I like to segment my email list based on their interests and what they enjoy reading most.
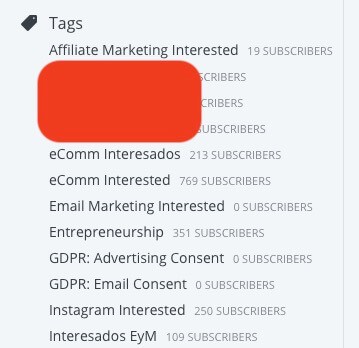
For example, if you have a website with 5 big categories you could tag your newsletter audience and filter them into those categories with tags to understand what they enjoy reading more.
While you can understand that using any analytics tool, the powerful thing about this feature is that later you can send custom emails to those people or just send different emails tailored to their interests to keep your open rates much higher.
Convertkit initially allowed me to tag my email subscribers using triggers, which is a feature where you can set up a link in your emails that detects when somebody clicks it and then adds a tag to the respective subscriber. This was a tedious way to do it because I ended up with dozens of triggers and automation (one for each newsletter I sent).
However, Convertkit has implemented new ways to do this which are quite beneficial for professional bloggers and online creators if you’re using WordPress. I’ll explain that below.
Tags alone are not something unique and many ESPs have similar features however the way Convertkit handles the tags and users itself is the best way to work for bloggers who can have audiences interested in several topics at the same time.
As opposed to other services where you need to set up different email lists to each group of people (list-based), Convertkit is subscriber-based and they don’t duplicate the subscribers even if they are tagged or filtered through different interests.
For example, in my last billing I got charged for 16,667 email subscribers as you can see below:
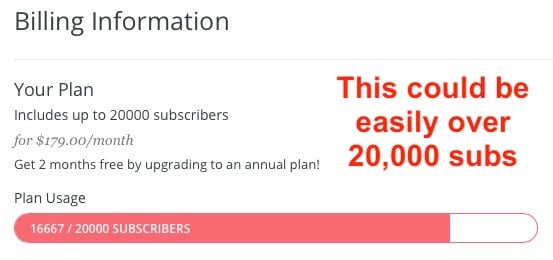
However, if I was using another service like Mailchimp I would have to pay easily for over 20,000 subscribers because there are many subscribers in my lists that are subscribed to different tags, email sequences, and even on different websites.
Don’t even get me started with those companies that charge you unsubscribed subscribers as well. It just doesn’t make sense and you have to manually delete them every month so you don’t get overcharged is just an excuse to make more money in my opinion.
Want to try Convertkit? Get a 14 days free trial here!
Convertkit Landing Pages and Integrations
This is something I originally wasn’t going to cover in my review, but Convertkit recently launched their new landing pages and they look good. With a few dozen email templates available so far (fully customizable) you can start getting leads easily without requiring additional software to build your landers.
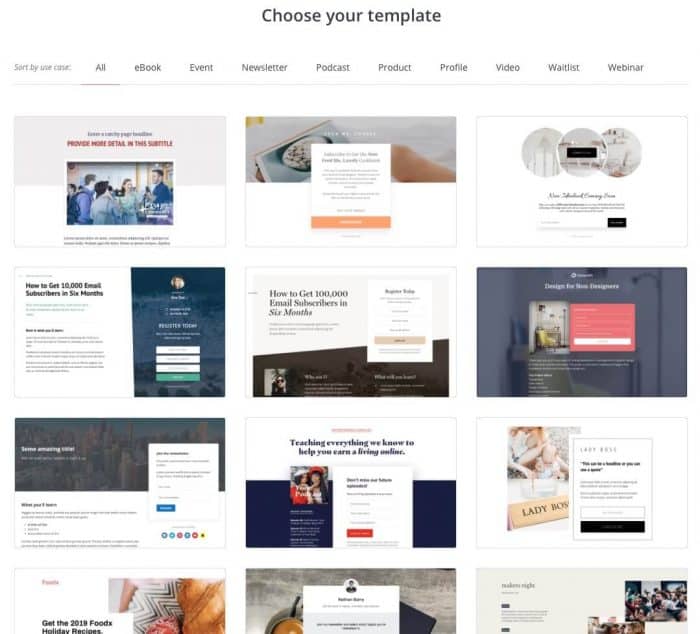
If you’re a blogger and you have tried to build a landing page before, you probably have heard of services like Instapage, LeadPages, OptimizePress, etc. All of them offer you simple ways to build landing pages with WYSIWYG/drag and drop visual editors so you can craft beautiful landing pages without being a coder.
Some of them come in the form of WordPress plugins/themes and some of them work as stand-alone SaaS and have a monthly recurring value of $50-300 per month.
However, most bloggers used them for simple lead generation or sales pages to promote their eBook, courses, memberships, etc. to make money with their websites. Having landing pages like that integrated and for free in Convertkit easily saves you the hassle and saves you a few dozen bucks per month unless you’re a coder/designer and you didn’t have to pay for it.
The only thing that I don’t like about the landing pages is that they’re hosted in Convertkit’s domain. I know they’re soon coming with a way to add your domain name but I had to say it. Nothing is perfect in this life.
If you still want to integrate Convertkit with any software here are some of the integrations Convertkit supports including Zappier, which allows you to add a ton more capabilities if you know your way with it.
Convertkit Email Broadcast text editor
Broadcasting emails (also known as email campaigns) or creating email sequences with Convertkit is quite easy. In fact, the email editor is so simple many people starting asking for a better editor which is already in the works and there’s a BETA you can test.
For me as a blogger, however, this simple email editor does the work and since I’m not a designer I like the results I get with it.
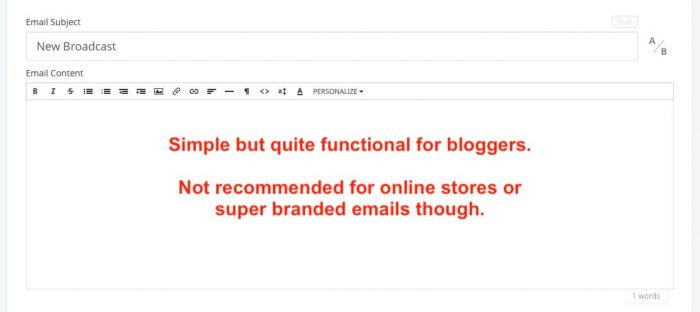
A few years ago, many professional bloggers started noticing that simple text emails had a great response and open rates because they didn’t look flashy and promotional like an email from an eCommerce store looks like.
If you think about it, text emails are what you get when a friend emails you (as long as it’s not a SPAM email chain haha). They don’t come branded and they don’t have flashy sidebars/headers/footers and logos. I’m sure you can detect a sales email miles away before you open it.
If you’re a blogger and you follow other bloggers you might have noticed that going with simple and to the point emails is the best way to create trust.
Cons?
If you’re running an online store or emails for brands Convertkit might not be the best bet for you. Drip, on the other hand, has moved to an eCommerce focus and they have a lot of features, if not more, that will be useful to drive more sales with your email campaigns.
Want to try Convertkit? Get a 14 days free trial here!
Convertkit might be able to do the job but the reality is Convertkit wants to focus on bloggers and product creators to keep being great at what they do. I have no problems with it 🙂
Convertkit – A/B Testing made simple
Another feature I love and have been using for a year or more is the A/B test tool.
What this marketing tool does is simple but can be super powerful. When you create a new broadcast, you are allowed to type 2 email headlines instead of just one.
Once you send your email campaign (broadcast) there’s a first batch that goes to 30% of your subscribers with half of them receiving one headline and the other half receiving the other headline.
Convertkit measures the results and 4 hours later the best headline (the one with the best open rate) is sent to the rest (70%) of your subscribers.
Here’s an example where just by split testing the headline I got a 6% higher open rate and even a higher click rate:
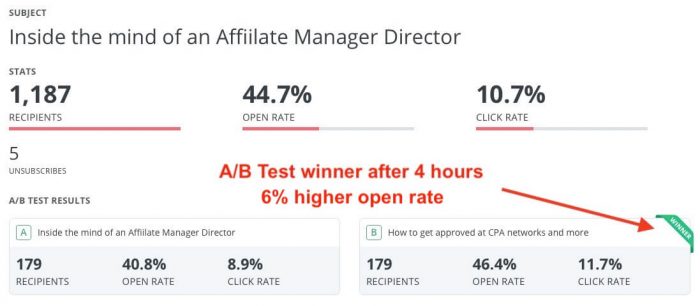
This feature alone is implemented in such a simple and visual way that is worth a lot in my opinion, and many other ESPs have something similar but not as easy to use.
- Pros: higher open rates and always testing and learning from your copy
- Cons: not really a con but I would love to have the ability to split test the content inside the email and the click rate as well. Fingers crossed 😉
Also, I remember the first time when I read a guide on how to set up an email reminder for those who didn’t open your first broadcast to get an extra 30% of clicks. I think that the post was written by Noah Kagan, the founder of Sumo.
The problem is most bloggers wouldn’t do it because it required too much work. With some ESPs, you need to go to your broadcast reports, create a new segment of people who didn’t open the email after a couple of days, and then write a new broadcast and send it to those people.
One time wouldn’t be a problem but creating segments every time you send an email was just too much effort. Convertkit has implemented this in a very simple way:
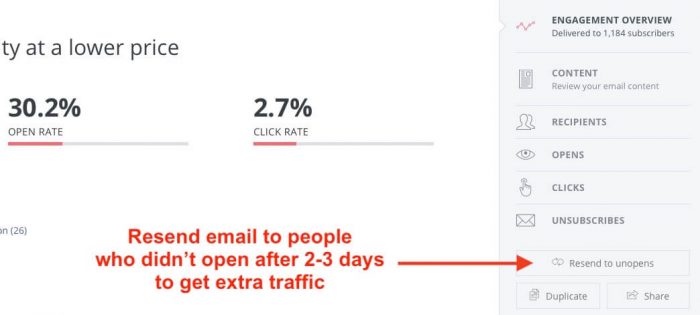
After a couple of days of sending your email, you just need to open your email report and click that button from the picture above.
Convertkit automatically knows which people haven’t opened your email yet and you don’t need to create a segment/tag or list for it to work.
Just click that button, select the time and date you want to send your reminder and you can also tweak your email content if you want.
That’s it.
Noah was right about getting extra traffic from people who initially didn’t read you with very little effort. Here’s one example I sent:
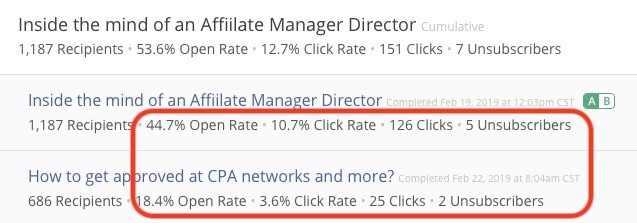
The first email had an open rate of 44%, which was fantastic, however the reminder for those who didn’t open it had an extra 18% open rate for a total of 53.6% open rate. If your math doesn’t add up, keep in mind the second email was sent to only 66% of the remaining people who had not opened the first one.
Sometimes this reminder gets me an additional 10-15% clicks as it did in the example above, and sometimes it’s almost 30-50% more. Don’t ignore this feature.
Want to try Convertkit? Get a 14 days free trial here!
Convertkit’s Double Opt-In process
One last thing I want to mention about Convertkit’s emails is how they can process your double opt-in subscriptions.
If you’re a blogger you have heard the advantages and disadvantages of using double opt-ins. For blogs with organic traffic, I think using a double opt-in form is the proper way to do things.
Double Opt-Ins allow you to get more engaged people, avoid bot and fake followers, and overall have a better open rate with lower spam complaints.
The drawback of using double opt-in is you end up having fewer subscribers.
But quality over quantity, right?
Tip: If you’re buying media (a.k.a. paying for ads) then I recommend you split test double and single opt-in. I have had some great results with single opt-in using landers and Facebook Ads and while the open rate definitely lowers the number of total subscribers easily makes up for it.
But going back to the double opt-in process…
Again, as bloggers, the common standard is to use a lead magnet to get more subscribers (subscribing to a newsletter is boring).
The lead magnet can be anything from a PDF, a report, a mini-course over email, a download, etc.
Whatever you’re using Convertkit can make this double opt-in process easier for your audience as you can deliver the lead magnet in your double opt-in email!
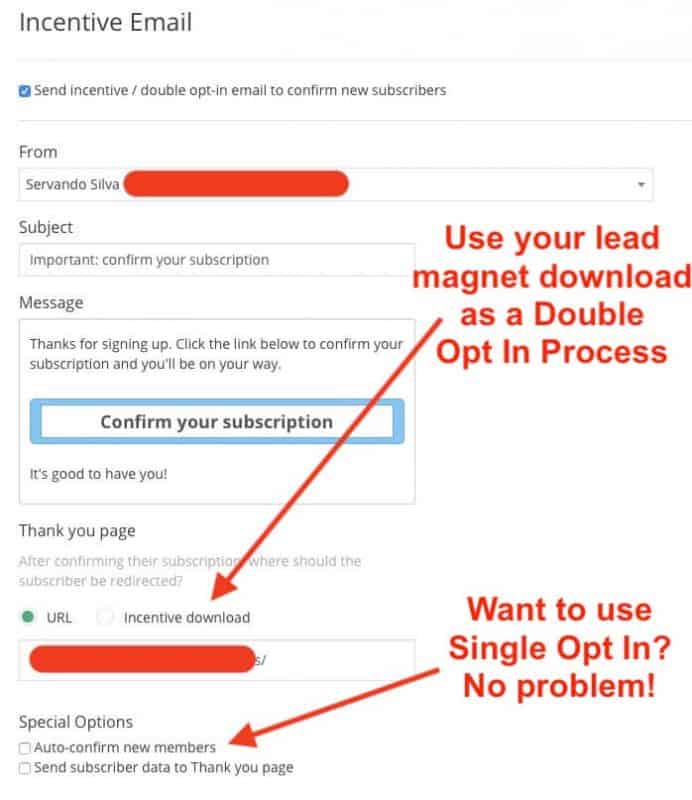
See?
So instead of having your readers to do this process:
- Sign up through a form they found in your website to get a lead magnet
- Show a message about double opt-in and how they need to check their inbox
- Go to email and find the double opt-in email – click it
- Receive their lead magnet in another new email once the user has been confirmed
If you’re using Convertkit they go through this process:
- Sign up through a form they found in your website to get a lead magnet
- Show a message about how you just sent them their lead magnet and they need to check their inbox
- They download their lead magnet and confirm the double opt-in at the same time
You will end up with more subscribers and better engagement this way. Also, fewer emails received in the SPAM or promotional folders as you will not be sending 2 emails quickly one after another (for opt-in and then the lead magnet) anymore.
Pruning your list with Convertkit
Keeping your email list clean is a fundamental part of this game.
Whether you like it or not, there’s a cycle of life between the time a reader subscribes to your blog and when they start ignoring your emails.
This cycle could last a few weeks, several months or maybe even years depending on how good your content is and the nature of your niche.
Think about this:
If you suddenly have a newborn at home and you’re looking for a solution to a problem (e.g. you need a baby monitor to check if everything’s alright from your office) for how long are you going to be interested in it?
Maybe a few weeks, maybe a few days.
If the list you end up subscribing talks about babies and related stuff you could be engaged for several months until your baby grows and goes into another stage of his/her life. But eventually, it’s going to end and your reader won’t be interested in baby stuff for a while anymore.
When that cycle ends, you might still be able to bring your readers back if you have great content related to that niche, but sooner or later they might just ignore your emails.
And when that happens, the best thing to do is to clean your list so you keep people who really open and click your emails and not just receive it and ignore it.
Or worst. Your email could be marked as SPAM or they could stop using that email account and switch to a new one.
Whatever happens, I have mentioned Convertkit is an ESP (email service provider) that automatically deletes and stops charging for any data that’s in your lists that shouldn’t be charged for.
- A reader marked you as SPAM? Convertkit won’t email them anymore.
- An email bounced hard because it doesn’t exist anymore? No problem.
- Someone unsubscribed because they’re not interested anymore? You won’t be charged.
The problem with many companies is they charge you for everything you have as long as you have it (data still uses resources in their servers?). They even charge you double or triple if one reader is subscribed to multiple sequences, but Convertkit doesn’t.
However, deleting those every few months isn’t that difficult. What’s more difficult and many people never do is to clean their inactive subscribers. Or Cold Subscribers as shown in Convertkit:
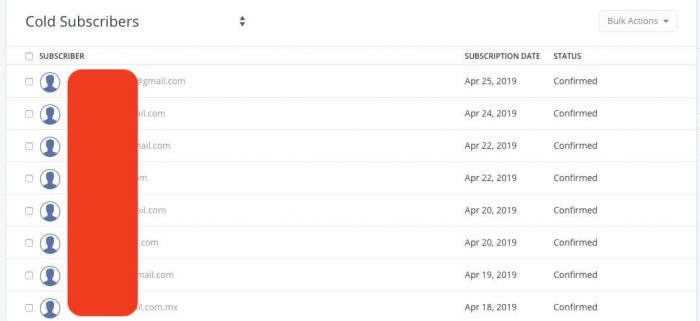
Convertkit will show you a list of cold subscribers for every segment or tag you create and everybody in that list hasn’t really opened any of your emails in the last 3 months.
If you don’t email people constantly then you might want to email them a couple of times before proceeding to delete any of them, but if you email your readers constantly (e.g. every week) and a reader hasn’t even opened anything in the last 3 months you could think of deleting them.
Before doing this, you can create a re-engaging sequence for those cold subscribers or send them just an email or two to ask them if they want to continue receiving your emails.
If they ignore that as well, it’s time to say goodbye 🙂
You can also more or less automate this process by tagging all of your cold subscribers and set up a trigger to delete that tag for every person who lets you know they still want to read your lovely mails.
It’s a simple process and you’ll end up with a higher quality list, higher open rates, and a lower bill at the end of the month. Want to try Convertkit? Get a 14 days free trial here!
And talking about email automation…
Convertkit Email Automation Rules
One of the first things I said about Convertkit was the ability to segment and tag subscribers.
While that feature alone can be strong, it can become much more powerful if you automate the process.
In my case, I have a ton of automation flows set up in my account to filter and segment users based on their engagement.
For example, if a reader subscribes to a sequence or a mini-course once they finish it they are automatically segmented based on their interests and at the same time, they are assigned into a segment where I can now email them regular broadcast (I don’t send them email broadcasts before that).
You can also set up triggers in your emails to ask them questions and based on their response add them to new sequences or delete them from old ones.
If you integrate Convertkit with a merchant processor you can also automate things like deleting them from a sequence once they have bought a product and things like that. This could be very useful for professional bloggers selling digital products as you don’t want to keep annoying your customers with sales emails.
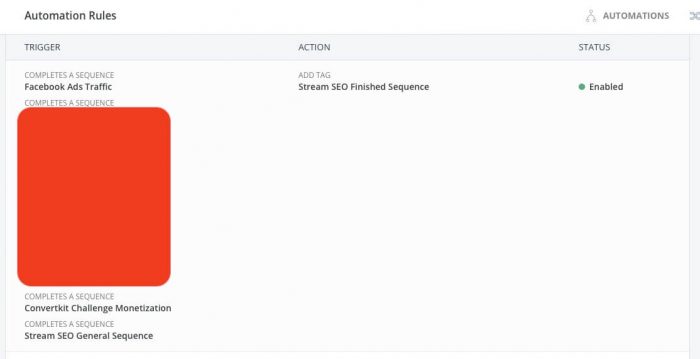
Convertkit also has a visual automation feature where you create your funnels with graphics like a map. But I’ll be honest and say I’m not a fan of ANY visual software for email automation so I literally have ignored it so far.
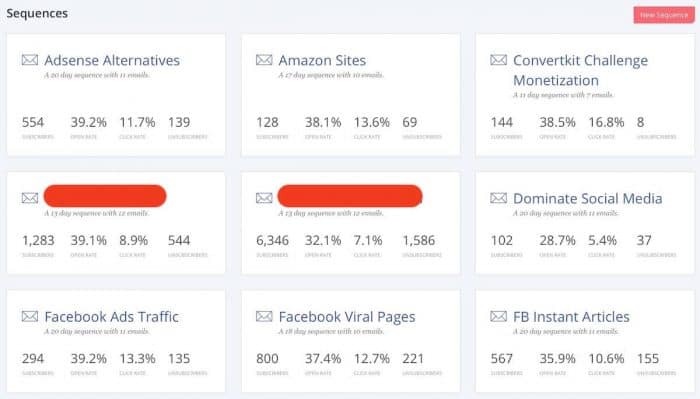
One thing I do to increase my engagement and number of leads in my blogs is to create different sequences based on the interests of my readers. For example, in Stream SEO if you’re interested in learning about Social Media, you will get a different sequence than somebody that signed up in a form while reading an SEO article.
I have dozens of sequences setup in my Convertkit account as you can see below:
When you check out your form stats you’ll get a graph with the number of daily subscribers and each block represents a different form on your website. As you can imagine, I have dozens of forms on my website to match every sequence:
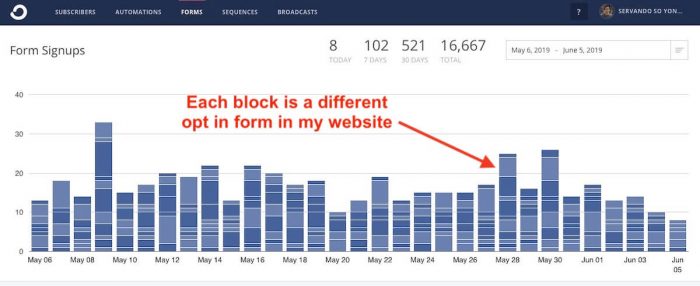
This is a very powerful feature that you can do with Convertkit and you can also do it with any other automation list, but the reason a lot of people don’t do it is that it’s difficult (and expensive) to manage once you have several forms and sequences.
Pro Tip: The idea is to go and pick your top articles with the most traffic from your blog. Most blogs will have a few pages where they receive 80% of their organic traffic.
For example, if you have 100 articles on your blog and you receive 1,000 visits every day you might realize that 20 of then (or less) are pulling 800 visitors or more and the rest is distributed between the other 80 articles left.
Go into your insights and pick the top 5 or top 10 articles that are pulling decent traffic and write them down.
After that, create an email sequence that makes more sense for those articles with more articles related to that category (instead of asking people to sign up to a general form).
Create a form with a text and headline completely related to that article and then link the form to your new sequence and finally display that form in the beginning or middle of your article.
And just like that, you’ll increase your email list sign-ups by up to 300%!
It’s easy to understand why this method works better than showing a generic popup/sidebar form on every page of your site.
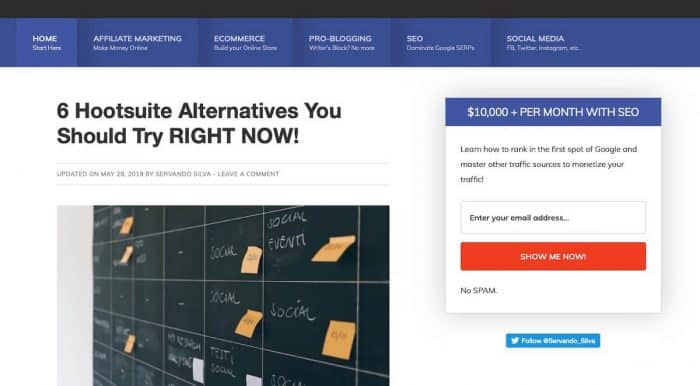
Instead of simply showing a form in the sidebar like this one in my sidebar with an average of 1% opt-in rate (industry standard):
Now you also have a very specific form inside your content that relates completely to the title of your article and might help your readers with a customized sequence like this one:
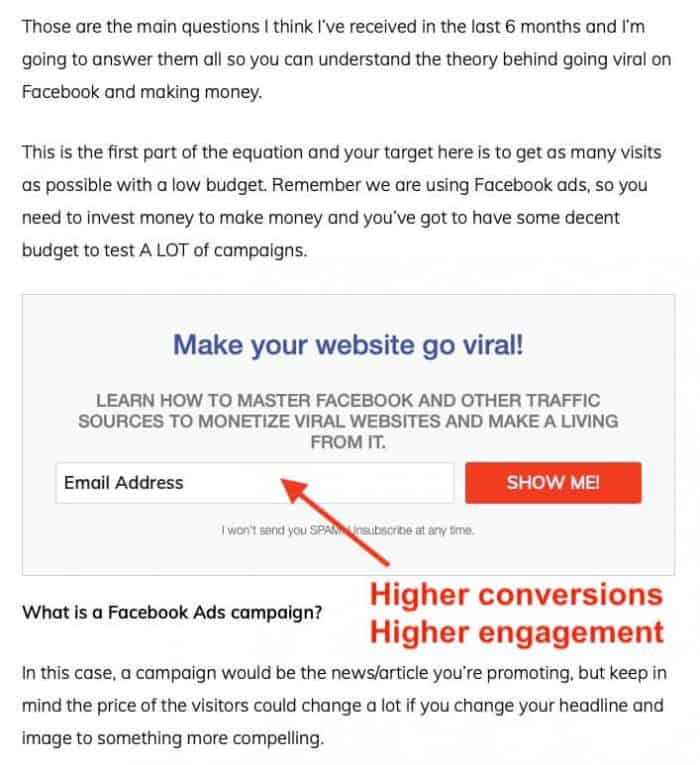
These forms have much better sign up rates (3-5% opt-in rate from what I’ve seen) and your emails in that sequence will also have a much higher open rate than the people who sign up to your generic sidebar/popup/after entry/homepage forms.
And because of that, your email sequences will have numbers like this, where we get an average of 40% open rate:
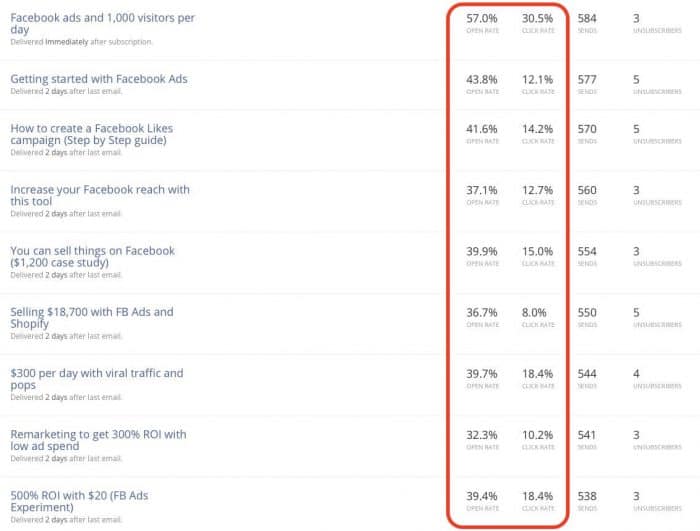
Convertkit has this dashboard that allows you to see how an email from each sequence performs and tune it (take out or add new emails) to your needs according to the results.
If you’re a blogger who is focused on a very specific niche (narrow or micro-niche) you might not need to set up different sequences as all of your readers are interested in the same stuff, but you could still use this type of automation and filtering to set up different levels of clients or something like that. It’s up to you and your creativity.
Tip: You can use this type of segmentation and email database to create lookalike audiences on Facebook 😉
However, if your blog is in a broad niche or you’re going the authority route and you’re covering several categories the email strategy I just described above will help you get more subscribers, better open rates, and more clicks to your site.
Want to try Convertkit? Get a 14 days free trial here!
Now, as I’ve said before, having multiple forms or sequences is not something impossible to do with other ESPs. However, it’s just way easier when you can automate the process and you don’t have to set up a new email list for every form with a different sequence you want to create (and be billed for those duplicated contacts at the same time).
WordPress user? Convertkit is for you!
With WordPress taking around 32% of the market share and most blogger guides being focused on WordPress it’s hard to imagine you’re not using it for your blog.
If you are, Convertkit has a simple but useful plugin that connects to your account and allows you to select a default form for each blog post. You can also insert with simple tags any form you want into your posts which is what I do because I prefer adding the form in the middle or almost the beginning of the content (not at the end like the plugin does).

However, the most interesting thing here is the ability to add tags to your readers, which brings automation to a whole different level.
Here, you can select a tag for every post of your WordPress blog and the readers will automatically be added to the tags based on which posts they read without you having to create automation, triggers, etc.
That’s why I have over 20 tags in my Convertkit filters, each one with hundreds of subscribers based on what they read in my blog.

As I said before, perfect segmentation for bloggers!
And if you get into a subscriber’s information you can see which tags they have been added to, the sequences and forms they have subscribed to, and modify it to your convenience if needed.
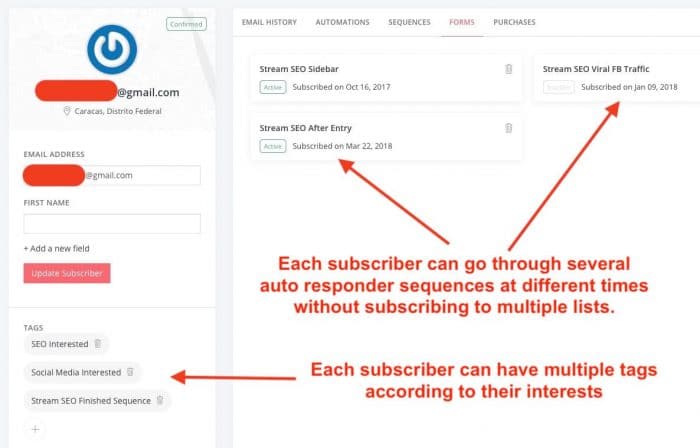
Overall, I’m happy with all the features I’ve been using with this email marketing software. I know there are a few more than I’ve been ignoring but I learn slowly as it took me 2 years to finally write this post 😉
Convertkit – Summary and Conclusions
I plan to stick with Convertkit for a long time as long as I don’t find a better alternative. Their team has been very active in modifying and adding new features and they have a public roadmap that explains what they’re planning to add in the future.
Nathan Barry is also very active in social networks and it’s easy to get a hold of him, or so it appears, as many bloggers tweet him and he answers back (including me a couple of times).
As for customer support, to be honest, I normally don’t use it a lot and I never do with most SaaS companies like this one. I consider myself pretty tech-savvy and Google is my best friend to solve problems. If I ever have to reach the support team it normally means problems and I should stay away from that service.
However, I have contacted customer support (live chat) a couple of times mostly to ask them about new features or a way to do stuff that I can’t because it’s not available and they have answered me back with solutions both times within a few minutes or hours as long as the live chat is functional (they have working hours). I’d say their customer service is good, but not excellent. If they had 24 hours service it would be great for people who don’t live in America.
Who knows, I might consider paying they yearly plan next time they have an offer because I know I will be using them for a while. The only competitor I was considering back then when I switched to Convertkit was Drip, but nowadays Drip has changed a lot and many people have mixed feelings about them as they have completely changed their focus to eCommerce while doubling their prices and more.
Since my email marketing focus is on blogs and info products I’ll stay with Convertkit as my main email marketing platform for now and hopefully I’ll see it grow a lot more as it has happened in the last couple of years (both in revenue and features).
Before closing this review, I’d like to quickly mention the things I like about Convertkit AND the things I miss or would love to see as well. Consider this a pros/cons summary:
Pros:
- Advanced segmentation features but not so advanced that people have no idea how to use them
- A/B test and re-send to unopens within 1 click
- Good pricing for medium/large bloggers.
- Repeated subscribers in different forms/sequences/tags don’t add to your total count
- They focus completely on bloggers and product creators, so the features added mostly follow that niche
- Landing pages integration without paying for extra software
- WordPress plugin for more advanced segmentation
Cons:
- I’d love to have a pie chart for subscribers by geo/country
- Beginner’s plan might be a bit expensive especially if you compare it against Mailchimp. Convertkit Pricing is good for medium/large sized lists though
- If your focus is eComm or other types of CRM Convertkit might not be your best choice, and they don’t focus on your profile anyways
- Plans don’t downsize automatically (but they upsize automatically of course) which sounds like a weird marketing technique to squeeze some extra money for the people who don’t know it. You need to contact their support if you clean your list and now you have fewer subscribers and need a lower plan. They change it quickly but this step shouldn’t be necessary.
- You can’ t send emails according to your subscribers time zone, so all emails go out at the same time which isn’t the best for worldwide audiences
Additionally, I’d like some features that aren’t available in the competition so I don’t consider them “cons” like:
- Ability to split test content and click rate (mentioned it in the A/B test section)
- Select the color of each form instead of having them all blue. that way I won’t need to scroll over with my mouse to see which form we are watching at that moment
That’s all folks!
I really hope this review has helped you understand why a lot of bloggers have switched to Convertkit and why you should move as well.
If you’re a blogger or webmaster Convertkit will be one of your best investments and as you can see the filtering/segmentation options will give you an edge for sure.
Want to try Convertkit? Get a 14 days free trial here!
If you’re new and have less than 500 subscribers I understand why you might want to stay with Mailchimp, but otherwise, you should jump to Convertkit and start using their features to get more clicks, more subscribers and more sales!


